Re-Installed Sound System
Following up the last post, here is a documented post of the re-installation of a sound system and new board. Here is a list of what was installed and done: 1 DBX Drive rack, 1 Yamaha power amp, 1 Crown Power amp, 1 Yamaha LS9, 1 Yamaha stage box.
A little back ground to help explain why some things were done the way that they were in this install. This instal was very last minute due to an emergency within the church campus. The main building where services are held was structurally damaged and could not be used until repaired. Because of this we were forced to move in to the smaller old sanctuary that was set up for the youth, although both venues were used for music and messages, each one was set up differently. Because it is a different system some things were done that would not normally be done in other installs. With that said here we go!
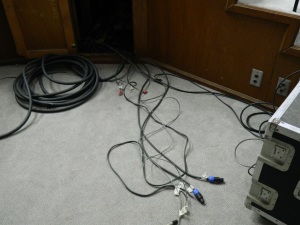
Lets begin with one of the most important steps when re-installing a sound system. Labeling! You cannot label enough, the more you label before you remove the system, the easier it will be to put it all back.

In the picture above all the connections had been previously labeled and tucked away so that while the building was being carpeted, none of the cables were disturbed. Pictured we have the following types of connectors, NL4, XLR, and Raw connector less cable.
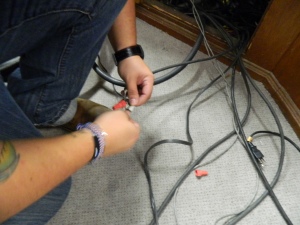
First things first we reconnect with the previous sound systems wiring. This patch was done because the previous sound system was done in such a way that it required this patch job if you will instead of a full rewire of the sound system, which can be quite expensive but well worth it if you have the time and the money.
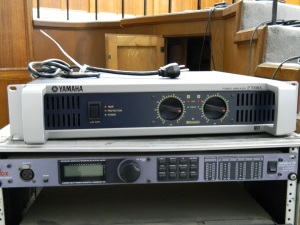
Once the system was patched in we can go ahead and make the necessary conections based upon the labeling that was done previously. Let’s follow signal flow: Our L&R input come from the console and into our Drive Rack, from there it is distributed by crossovers to their respective amplifier. Our Highs and Mids go to the the Yamaha P700S
our Lo’s will go to the Crown 5000
and finally our Left and Right feed from the console
From here we can now hook up our speakers.
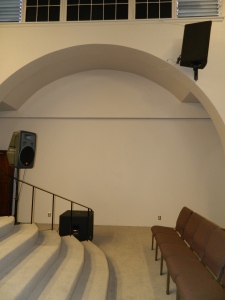
Now onto one of the other issues that I ran into. There were not enough chairs to house the church members, so they decided to add 4 more rows. in doing so the Subs needed to be pushed back as well as now we have 4 rows of people behind the mounted speakers. So not only are we going to run into phase issues as well as poor sound for the first 4 rows. To help solve this we needed to add a set of front fills, but that in itself came with an issue as well.
So here is our dilemma… We have about an 8 foot gap between our mains and Subs, which can be easily fixed with a delay from the drive rack, and we can also delay the fills as well so that all the sound comes at one time rather than from 3 different sources. The problem we ran into is that the drive rack did not have the 4th output to add the fills. So because of the time restraint and budget restraint I had to run splitters from the Hi’s and Mids for the mains and front fills. So the problem continued. After a discussion with the church they understood what needed to happen, the only problem was there was no time/money to do out and buy a new drive rack. I was told to just make it work as best as possible. so here is what I ended up doing.
I ran a few of my favorite records through the room and made adjustments to the amplifiers to get a decent gain stage and then moved to the Ashley 31 band EQ’s and slightly tuned the room. This was not my main tune it was to get a good base to start. Once that was finished I began to delay the speakers to try and obtain as little phase and delay issues as possible. I decided to do it all by ear, with everything taken into account the Hi’s and Mid’s were delayed 6.24 mSeconds, with this delay in the speakers the phase was very minimal and to the regular listener it would never be noticed.
From here began the new instal of the LS9 and Stage box. Up until this point we had been working with an Allan&Heath analog console with 24 channel snake. This is why i had not fine tuned the room yet, because of the new console, the signal will change slightly.
This console is one of the easiest installs anyone will ever complete. Small note before we dive into the console install, there are steps that will not be covered as far as the routing of the outputs go, this requires a computer and installer. But don’t let it deter you from purchasing one of these LS9’s they come with what you need to do it as well as the technical support you need to set up your needs.
Here is what is amazing about these new consoles. With the old console we needed to run a 24 channel snake, 4 aux sends and main left and right. all of this is run under the floor, if your counting that is a thick cable containing 24 channels, 4 aux send cables, and 2 main cables. that is 30 cable all being run, if something goes wrong all those cables would be pulled, and that does not even include the outboard gear used for the FX and Compressor. With the LS9 we are able to run 1 CAT5 cable. In conjunction with the Stage box we now have access to 32 channels, up to 8 outputs. So we have now added 8 more channels and 2 more outputs to the system, more than any church service would need.
So Lets Break it Down into 4 Simple steps
1 Plug in Console,
2 Place and Plug in Stage box,
3 Run CAT5 cable from LS9 to Stage Box.
4 Connect your main L&R from Stage Box to Drive Rack. (Routed from one of the 8 outputs that were previously set up using the console software needed)
and that is it!
From here the room was tuned using the on board master EQ, the rehearsals were run and here is a small video capturing some of the sound that took place the very next evening.
Thank You for swinging by, I hope this is helpful and please check back for more updates and other projects.
-Matt


Leave a comment